
Structure of test automation project

Note: If you are new to java and selenium then start with selenium java training videos. 
 
Have you come across situation when you did not know where you should keep the test class, page object or any supporting class. I am going to share some of the practices I follow when working on test automation project. Given that I work with java and maven, it solves the problem of the directory structure. Maven project may have many directory but these are the ones I use most -

src/main/java - any non test class, i.e - page object etc
src/main/resources - resources like - properties file, text file etc used by main classes
src/test/java - the test classes
src/test/resources - resources like - properties file, text file etc used by test classes.
target - this directory is created automatically building a maven project and

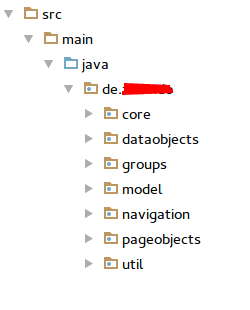
Let’s focus on src/main/java - this is a directory which contains all of non test code. I usually end up having following structure on src/main/java -

src/main/java
com.google
core
dataobjects
groups
model
navigation
pageobject
util

Hence it looks as -

Screenshot from 2016-07-27 10:16:07.png
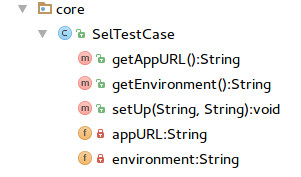
Package core contains SelTestCase class which takes care of setup and teardown. Given that I use STF, I don’t have to set up browser myself and setup method is mere access to application URL, test environment etc

Screenshot from 2016-07-27 10:21:45.png

Package dataobjects contains the test data objects used by the test classes -

Screenshot from 2016-07-27 10:32:41.png

Package groups contains TestNG test group. It is set of classes with String constants so that I can easily change the group name by modifying the String constants.

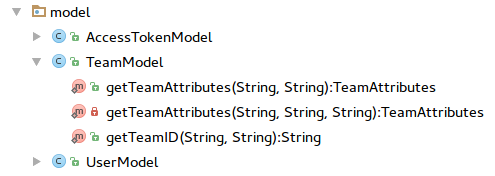
Package model contains the API definition which are used by either test classes or page objects -

Screenshot from 2016-07-27 10:34:56.png

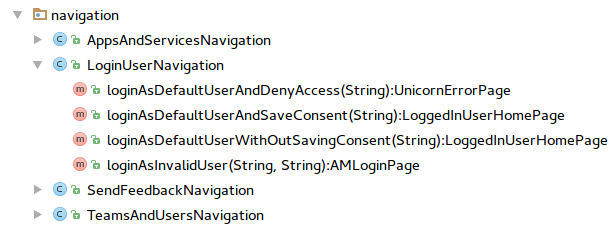
Package navigation contains the Navigation APIs for navigating through application pages. Hence navigation steps don’t have to be repeated in test classes or page objects -

Screenshot from 2016-07-27 10:40:02.png

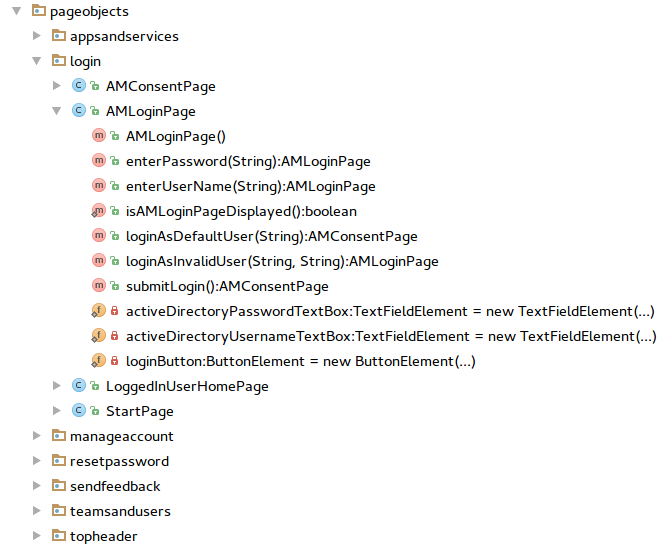
Package pageobject does not need any introduction :-). I further divide pageobject package into application areas for which page objects are to be created -

Screenshot from 2016-07-27 10:45:12.png

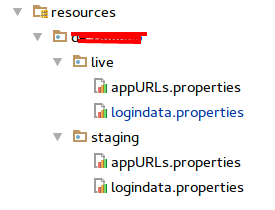
I further divide /resources package into application environment related entities. I set up environment parameter in testng.xml file and depending on the environment corresponding data set is picked up for test run -

Screenshot from 2016-07-27 10:49:45.png

The test package contains the test classes. Like the page object, I created various packages to contain test classes of application area -

Screenshot from 2016-07-27 10:54:30.png

At times I also create util package containing utility classes. Though I would not recommend this approach as util package tends to become dumping ground of unrelated classes. A better approach would be to create dedicated packages for those classes.

This brings us end to this post. What do you think of this package structure? How does your test structure look like?

Popular posts from this blog

Appium and android mobile app automation

Next appium and Android mobile app automation video tutoria l is live. If you are new to appium then please check - appium-tutorial This video tutorial covers - Start vysor (Just for this session and not mobile automation :)) Start appium and start appium inspector Desired Capabilities platformName - Android deviceName - L2N0219828001013 (as seen on "adb devices") Saved Capability Sets Start Session Scan app elements using appium inspector Get appPackage and appActivity using "APK info" app Install "APK info" app and open app whose appPackage and appActivity are required i.e. calculator Check top section of app icon com.android.calculator2 is app package com.android.calculator2.Calculator is app activity testng.xml file settings for running Android app tests Test details com.seleniumtests.tests.mobile.AndroidAppTest and CalculatorScreen class View beautiful STF test report  

Return only first or last element from webelements collection

Note: If you are new to java and selenium then start with selenium java training videos .     We often come across situation when there are multiple elements on a page and we probably like to exercise only a few of them using selenium webdriver. May be just first and last element. For example on a search result page we may like to click on only first and last link and not all. This is when Iterables API comes handy. (By the way I am assuming that you have already completed watching selenium training videos :)). Once we have collection of web element then we can use Iterables to get only first or last element as following - Consider that we fetch collection of element as - List< WebElement > webElements = getDriver().findElements(By. id ( "htmlID" ));   Now we can get the first web element from this collection as -  WebElement firstElement = Iterables. getFirst (webElements,  getDriver().findElement(By. id ( "defaultElement" )));   Herein second

Using chrome console to test xPath and css selectors

Note: If you are new to java and selenium then start with selenium java training videos .       Since the advent of selenium there have been many plugin to test xPath / css selectors but you don’t need any of them if you have chrome browser. Using Chrome console you can test both xPath and css selectors. Launch website to be tested in chrome browser and hit F-12 and you would see chrome console opened in lower pane of application - Hit escape key and console would open another pane to write element locators - And now you can start writing xPath or css selectors in chrome console and test them - The syntax for writing css id - $$(“ ”) And hit the enter key. If your expression is right then html snippet of the application element corresponding to the css selector would be displayed - If you mouse over the html snippet in chrome console then it would highlight the corresponding element in application - If you want to clean console of previously wri