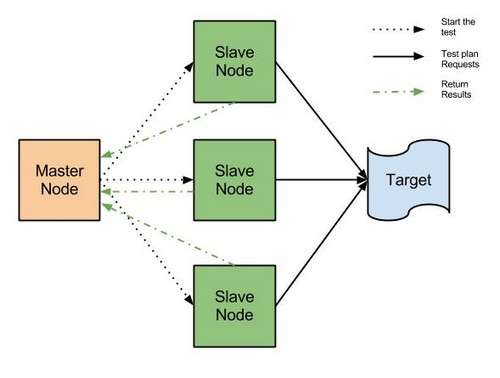
Distributed Testing with JMeter
When one JMeter client is not able to offer amount of threads required for load testing then distributed testing is used. In distributed testing -
- One instance of JMeter client can control number of JMeter instances and collect data from them
- Test plan does not need to be copied to each server, the client sends it to all servers
note - JMeter will run all the threads on all the servers, hence 100 threads on 5 JMeter server would pump 500 threads in total.
If many server instances are used, the client JMeter can become overloaded and so the client network connection. This has been improved in latest versions of JMeter by switching to Stripped modes, but you should always check that your client is not overloaded
When Client (master) and Server (slave) nodes are on same network (no SSH required)
Configure Client Node
Herein client is referred as the machine controlling test execution on other JMeter nodes. This is also referred as “master node” since it controls the test execution while “server Node” are referred as “slave node” since they execute the actual test
Add Server IP to Client Properties file
Edit property - /bin/jmeter.properties in client JMeter machine, find property “remote_hosts” and add value of JMeter servers IP address. Multiple servers can be added comma-delimited.
A more convenient way to specify remote host is from command line. Use -R command line to specify which remote host to use (example described below).
Specify client RMI port
Specify client.rmi.localport in jmeter.properties file (for example - client.rmi.localport=25000). This is the port on which the local JMeter instance will listen for the Remote Method Invocation (i.e. RMI connections) from the slave nodes. Results would be sent to client from slave nodes on this port
Configure Server Nodes
- Server nodes should be running same version of JMeter and java as client
- Test datafiles are not sent across by client, hence they should be available in appropriate directory in each server. You can keep test data file in /bin folder in each JMeter server. It gets you rid of specifying full qualified path of test data file on each server instance.
- To use different values for properties use corresponding values for user.properties and system.properties on each server
- server.rmi.localport- By default, RMI uses a dynamic port for the JMeter server engine. This may cause issues with firewalls, so with versions of JMeter after 2.3.2 you can define the JMeter property server.rmi.localport to control this port number. To use a specific port for the JMeter server engine, define server.rmi.localport property before starting the server
Start Server
JMeter server component is available in following directory - - unix/mac - JMETER_HOME/bin/jmeter-server
- Windows - JMETER_HOME/bin/jmeter-server.bat
and start server as -
unix/mac -
./jmeter-server -Djava.rmi.server.hostname=10.161.142.227
windows -
jmeter-server.bat -Djava.rmi.server.hostname=10.161.142.227
java.rmi.server.hostname is specified when starting the server, else you may end up with “loopback address” error.
On starting server you would receive message like -
Created remote object: UnicastServerRef [liveRef: [endpoint:[10.161.142.227:60000](local),objID:[-1c51de21:14fd1765827:-7fff, 7690653623616494857]]]
Herein endpoint is IP - 10.161.142.227(the IP address of server node) with port 60000 (this is server.rmi.localport specified during server node configuration)
Note that you would have to chmod +x on /jmeter-server and /jmeter-server files before you can start jmeter-server file on unix
There can be only one jmeter server on each node unless different RMI ports are used
Check Configuration
Start JMeter client > Remote Start and Remote Stop should contain the client set in properties file -

Start JMeter in non GUI mode
Start test on remote server in non GUI mode as -
jmeter -n -t script.jmx -r
Herein flag -r is to Start remote servers (as defined in remote_hosts property on the master no). Hence this command will start test on remote_hosts
As specified earlier, a more convenient way to execute tests on remote server is to specify server from command line as following -
jmeter -n -t script.jmx -R server1,server2...
If you want to exit remote server after test is over then use flag -X as following -
jmeter -n -t script.jmx -R server1,server2 -X
When Client (master) and Server (slave) nodes are on different networks (SSH required)
When running test from remote server machines (i.e. aws or google cloud), we need to establish ssh tunneling to make servers available to jmeter client machine. Herein communication between jmeter client and servers is established using JMeter connection and Remote Method Invocation (RMI).
JMeter connection is started by JMeter client (master node) while TCP connection for RMI is started by both JMeter client (master node) and servers (slave node). Hence it results in creation of three connections -

Image Source - cloud.google.com
We will use ssh port forwarding (or ssh tunneling) to establish connection b/w JMeter client and server. We will use the localhost address and forward certain ports.
As illustrated above, two connections are required from “L”ocal JMeter client to remote server while one connection is required from “R”emote JMeter server(s) to local JMeter client. Hence we create three tunnels, two out going (“L”ocal JMeter client to remote servers) and one incoming (“R”emote JMeter server to local client)
Following command will set up forwarding on three ports -
ssh -L 24001:127.0.0.1:24001 \
-R 25000:127.0.0.1:25000 \
-L 26001:127.0.0.1:26001 -N -f <username>@<server>
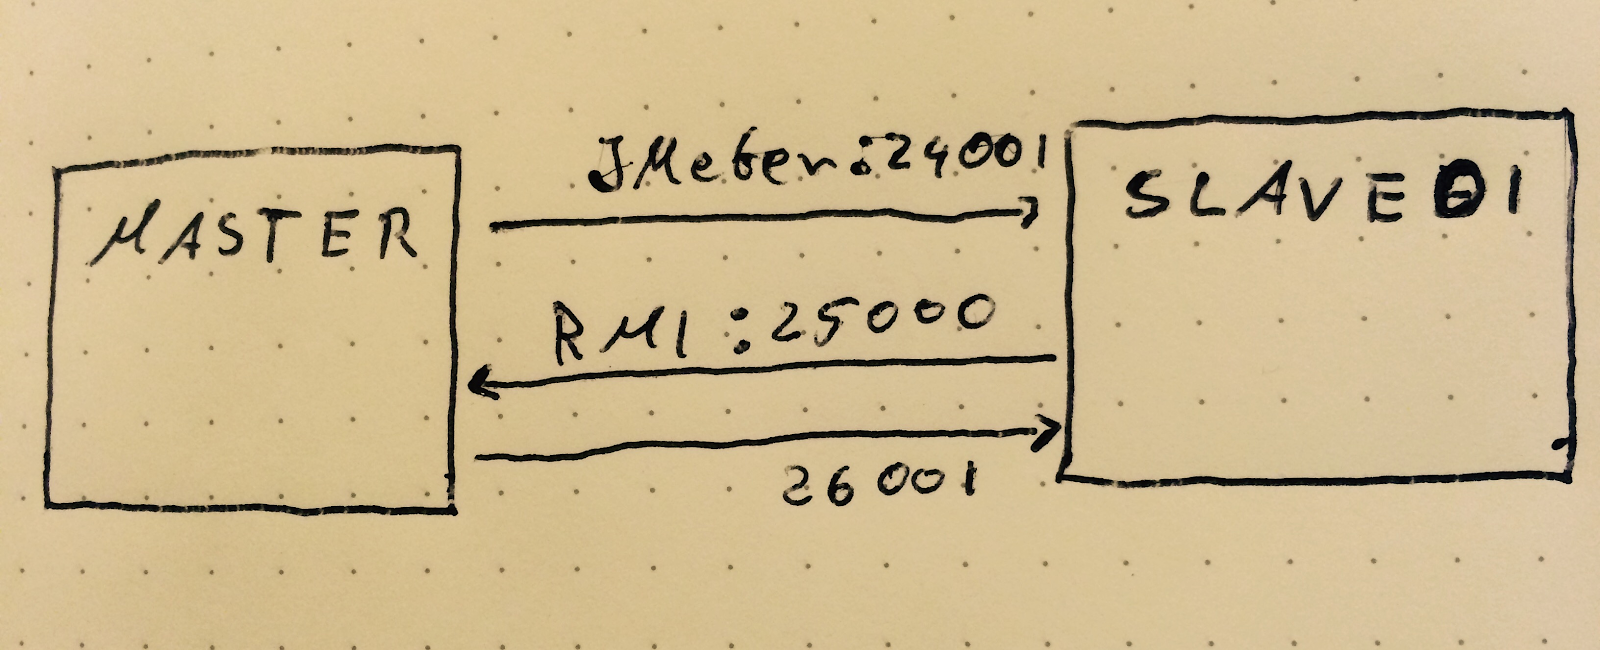
Image Source - www.artofsoftwaredevelopment.com
Of course, you would not be pumping load from just one JMeter server, you can set up more ssh tunnelling as -
ssh -L 24002:127.0.0.1:24002 \
-R 25000:127.0.0.1:25000 \
-L 26002:127.0.0.1:26002 -N -f <username>@<server>
and so on…
-N and -f options are used since you only need to set up SSH port forwarding and will not execute remote commands. Hence you will not get shell to execute commands.
Port forwarding syntax - 24001:127.0.0.1:24001 may seem a little confusing. Herein 127.0.0.1 means localhost (i.e. 127.0.0.1) from the server perspective and not your machine. It means forward my localport 24001 to port 24001 on server. Hence it is -
ssh -L LocalPort:RemoteIP:RemotePort User@RemoteIP
For 26001:127.0.0.1:26001 - First you need to specify the port on which the remote server will listen, which in this case is 26001, and next follows localhost for your local machine, and the local port, which in this case is 26001.
Configure Client -
Now configure jmeter.properties file in JMeter client as -
remote_hosts=127.0.0.1:24001 (can also be specified from command line using -R option as specified earlier)
client.rmi.localport=25000 (the port on which results are collected and connection established by one of the RMI)
mode=Statistical
client.rmi.localport=25000 (the port on which results are collected and connection established by one of the RMI)
mode=Statistical
Notice that we define mode of data transfer on client (master) machine and not on slave machine. This is according to jmeter properties file -
# How is Sample sender implementations configured:
# - true (default) means client configuration will be used
# - false means server configuration will be used
#sample_sender_client_configured=true
If you want slave machine to decide (probably you would never want that) on mode of sampling then set `sample_sender_client_configured` to false and set mode on each slave machine.
Using any mode which writes results back to master would eventually affect the max throughput of test. According to JMeter -
<<
<<
Listeners in the test plan send their results back to the client JMeter which writes the results to the specified files By default, samples are sent back synchronously as they are generated. This can affect the maximum throughput of the server test; the sample result has to be sent back before the thread can continue.
>>
Hence I use mode DiskStore or StrippedDiskStore to have test results sent back to client after test run. Given that you would not have test results being sent to client machine till end of test run, you would like to print result summary on client to know summary of results during test run. Since jmeter version 2.13 I did not have to do anything extra to get summary of test result printed on console :-)
In DiskStore/StrippedDiskStore mode result is saved in java.io.tmpdir. Notice that slave jmeter instance should have permission to write to this file (/tmp or /var/tmp in unix system) else following message would be logged in jmeter-server.log file -
jmeter.samplers.DiskStoreSampleSender: Using DiskStoreSampleSender for this test run
ERROR - jmeter.samplers.DiskStoreSampleSender: Failed to create output file java.io.IOException: Permission denied
at java.io.UnixFileSystem.createFileExclusively(Native Method)
at java.io.File.createNewFile(File.java:1006)
at java.io.File.createTempFile(File.java:1989)
at java.io.File.createTempFile(File.java:2040)
at org.apache.jmeter.samplers.DiskStoreSampleSender.readResolve(DiskStoreSampleSender.java:157)
at sun.reflect.NativeMethodAccessorImpl.invoke0(Native Method)
at sun.reflect.NativeMethodAccessorImpl.invoke(NativeMethodAccessorImpl.java:57)
at sun.reflect.DelegatingMethodAccessorImpl.invoke(DelegatingMethodAccessorImpl.java:43)
at java.lang.reflect.Method.invoke(Method.java:606)
at java.io.ObjectStreamClass.invokeReadResolve(ObjectStreamClass.java:1104)
at java.io.ObjectInputStream.readOrdinaryObject(ObjectInputStream.java:1807)
at java.io.ObjectInputStream.readObject0(ObjectInputStream.java:1350)
at java.io.ObjectInputStream.defaultReadFields(ObjectInputStream.java:1990)
at java.io.ObjectInputStream.readSerialData(ObjectInputStream.java:1915)
at java.io.ObjectInputStream.readOrdinaryObject(ObjectInputStream.java:1798)
To overcome this you can specify your own directory which should be used to used to save test result when starting the jmeter server on slave -
./jmeter-server -Djava.rmi.server.hostname=127.0.0.1 -Dsun.net.inetaddr.ttl=0 -Djava.io.tmpdir=/home/<user>/testresult
Notice that you would have to create directory if it does not exist. In the following section of this post there are some shell script which could do this for you.
Once the test execution is over then test results would be sent back to jmeter client and stored in the file which was specified using -l parameter when starting the test. Be patient, it takes time for test results to be sent back to client machine ;-) You can verify n/w activity on client machine using iftop -n command once test execution is over. You would usually see higher n/w activity which is an indication of test results being sent to Client machine.
Once all test results have been transferred then you should see following message in client console -
Once all test results have been transferred then you should see following message in client console -
summary + 117 in 5s = 23.4/s Avg: 13 Min: 8 Max: 30 Err: 0 (0.00%) Active: 0 Started: 704 Finished: 720
summary = 181813 in 1027s = 177.0/s Avg: 590 Min: 7 Max: 4464 Err: 0 (0.00%)
Tidying up remote @ Tue Feb 16 15:03:05 CET 2016 (1455631385107)
... end of run
Once test results is transported to client then you can plot graph using jmeter listeners.
If you have highly responsive server then you may end up with following error on jmeter-server.log -
jmeter.threads.JMeterThread: Test failed! java.lang.OutOfMemoryError: GC overhead limit exceeded
Then it is time to reduce thread count or user more powerful test agent till this error disappears. Notice that this error is different than usual Out of memory error in jmeter which can be fixed by setting JVM memory arguments in jmeter.sh file. To know more about GC overhead limit exceeded error follow SO thread
We had described other properties earlier, except mode. It specifies how results are sent back from server to client. Statistical mode results in reduction of data transfer between server and client hence helps in not overloading JMeter client machine.
Configure Server -
Now configure jmeter.properties file in JMeter server as -
server_port=24001 (port used by JMeter connection. This connection is started by only JMeter client, see SSH tunnelling client above)
server.rmi.localhostname=127.0.0.1
server.rmi.localport=26001 (a second port on which connection is established using RMI)
server.rmi.localhostname=127.0.0.1
server.rmi.localport=26001 (a second port on which connection is established using RMI)
Notice that port numbers 24001 and 26001 are the ones on which port forwarding is established from local JMeter client to remote JMeter servers.
I did not find property server.rmi.localhostname in JMeter version 2.13, hence added it myself in jmeter.properties file.
Start the remote Server -
When starting JMeter server you need to tell JMeter to user localhost (127.0.0.1) as its RMI server -
bin/jmeter-server -Djava.rmi.server.hostname=127.0.0.1
This starts JMeter server and accepts connections from JMeter client.
Now you can start test from jmeter client and specify localhost as RMI server -
jmeter -n -t script.jmx -R 127.0.0.1:24001, 127.0.0.1:24002 -Djava.rmi.server.hostname=127.0.0.1
And then you would see following message on JMeter client -
Created the tree successfully using <Your_Test_Plan>.jmx
Configuring remote engine: 127.0.0.1:24001
Configuring remote engine: 127.0.0.1:24002
Starting remote engines
Starting the test @ Mon Nov 09 15:36:53 CET 2015 (1447079813692)
Remote engines have been started
Waiting for possible shutdown message on port 4445
summary + 3 in 6s = 0.5/s Avg: 139 Min: 58 Max: 191 Err: 0 (0.00%) Active: 1 Started: 2 Finished: 1
summary + 122 in 1s = 214.4/s Avg: 72 Min: 54 Max: 289 Err: 0 (0.00%) Active: 0 Started: 2 Finished: 2
summary = 125 in 6.1s = 20.3/s Avg: 74 Min: 54 Max: 289 Err: 0 (0.00%)
Tidying up remote @ Mon Nov 09 15:37:01 CET 2015 (1447079821532)
... end of run
And following on JMeter server -
Starting the test on host 127.0.0.1:24001 @ Mon Nov 09 12:28:20 UTC 2015 (1447072100754)
Finished the test on host 127.0.0.1:24001 @ Mon Nov 09 12:28:26 UTC 2015 (1447072106728)
that’s all :-)
Tips:
- I got following error when establishing ssh tunnel using command -
<ssh -L 24001:127.0.0.1:24001 -R 25000:127.0.0.1:25000
-L 26001:127.0.0.1:26001 -N -f tbhadauria@10.145.53.224>
<<Warning: remote port forwarding failed for listen port 25000>>
I updated client.rmi.localport to 24000 in jmeter.properties file of Client JMeter and changed the port 25000 to 24000 in the above command above and error disappeared. Refer SO post for more on this error.
- SSH tunnelling to multiple servers -
The process of establishing ssh tunnelling and launching individual server may become tedious when you have high number of load test agents. To overcome this, I created following crappy shell script which establishes ssh tunnelling and launches Jmeter server on remote servers -
#######################################################
local_port_begin_index1=240
local_port_begin_index2=260
#server_port is the server ip address followed by port end index used in subsequent script
for server_port in 10.145.53.223-01 10.145.53.224-02 10.145.53.225-03 10.145.53.84-04 10.145.48.204-05 10.145.48.202-06 10.145.48.203-07 10.145.50.42-08 10.145.50.41-09 10.145.50.40-10; do
server=$(echo $server_port|cut -f1 -d-)
port_end_index=$(echo $server_port|cut -f2 -d-)
local_to_remote_port1=$local_port_begin_index1$port_end_index
local_to_remote_port2=$local_port_begin_index2$port_end_index
$local_to_remote_port2:127.0.0.1:$local_to_remote_port2
# start jmeter server on remote instance
ssh tbhadauria@$server 'bash -s' < startserver.sh
# set up ssh tunnelling to JMeter servers
ssh -L $local_to_remote_port1:127.0.0.1:$local_to_remote_port1 -R 24000:127.0.0.1:24000 -L$local_to_remote_port2:127.0.0.1:$local_to_remote_port2 -N -f tbhadauria@$server
done
#######################################################
And shell script startserver.sh looks as -
#######################################################
# quit existing screens
for session in $(screen -ls | grep -o '[0-9]\{4\}')
do
screen -S "${session}" -X quit;
done
#create directory for testresult
rm -r testresult/
mkdir testresult/
chmod 777 testresult/
# start jmeter server
screen -d -m -S loadtest; screen -S loadtest -X stuff "cd apache-jmeter-2.13/bin/;./jmeter-server -Djava.rmi.server.hostname=127.0.0.1 -Dsun.net.inetaddr.ttl=0 -Djava.io.tmpdir=/home/tbhadauria/testresult;"`echo -ne '\015'`;
#######################################################
- Specify parameters from command line -
We have learned that we can specify parameters from command line using ‘-J’ literal. But during distributed testing we should use literal ‘-G’
hence if you use customer property i.e. -
-JCUSTOMERS_DURATION=1800 \
then it changes to -
-GCUSTOMERS_DURATION=1800 \
Notice that default JMeter property would remain as it is -
-Jjmeter.save.saveservice.output_format=csv \
The overall JMeter property configuration looks as -
-D[prop_name]=[value] - defines a java system property value.
-J[prop name]=[value] - defines a local JMeter property.
-G[prop name]=[value] - defines a JMeter property to be sent to all remote servers.
-G[propertyfile] - defines a file containing JMeter properties to be sent to all remote servers.
-L[category]=[priority] - overrides a logging setting, setting a particular category to the given priority level.
The -L flag can also be used without the category name to set the root logging level.
Further Reading -